Opening a new Contract

Opening a new contract for a reservation, a walk-in, or a corporate account is an easy straight forward process but at the same time has many options for adjustments and changes throughout the process. This article will walk you through a high level check out for a existing reservation and at the end will have links to other articles for more nuanced situations.


1. On the Rental Search page search you can select the Check Out button for any existing reservation to launch into the Check Out Process

Screenshot of: On the Rental Search page search you can select the Check Out button for any existing reservation to launch into the Check Out Process

2. It will prompt. you to make sure you want to start checking out this reservation. Select yes to proceed.

Screenshot of: It will prompt. you to make sure you want to start checking out this reservation. Select yes to proceed.

3. On the first page all the reservation details will be populated including dates times and the selected vehicle. You can click next to go to the next screen.

Screenshot of: On the first page all the reservation details will be populated including dates times and the selected vehicle. You can click next to go to the next screen.

4. On the next page you will see the primary driver is already filled in from the reservation. Open the driver to view and confirm their details.

Screenshot of: On the next page you will see the primary driver is already filled in from the reservation. Open the driver to view and confirm their details.

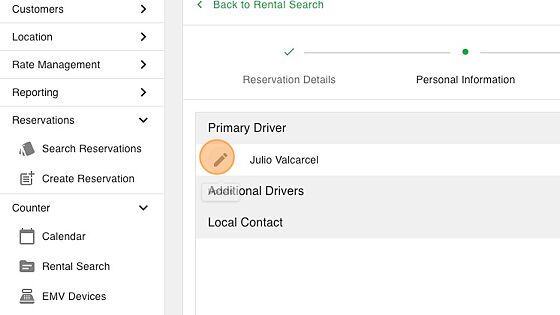
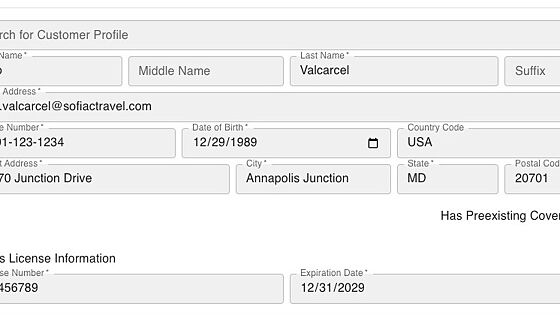
5. On the driver screen you can correct any information that is incorrect and then close the model by click Save if you updated their information or just cancel if it is all accurate.

Screenshot of: On the driver screen you can correct any information that is incorrect and then close the model by click Save if you updated their information or just cancel if it is all accurate.

6. You can then select to add any additional drivers to the contract.

Screenshot of: You can then select to add any additional drivers to the contract.

7. You can search for an existing renter or fill in the additional drivers details.

Screenshot of: You can search for an existing renter or fill in the additional drivers details.

8. Click "Save" to add the additional driver

Screenshot of: Click "Save" to add the additional driver

9. If you need to collect local contact information, add a Local Contact by clicking the add button.

Screenshot of: If you need to collect local contact information, add a Local Contact by clicking the add button.

10. The local contact is purely informational to be able to get ahold of someone in the case of an emergency. This could be anything/anyone including a hotel, airbnb host, or local friend.

Screenshot of: The local contact is purely informational to be able to get ahold of someone in the case of an emergency. This could be anything/anyone including a hotel, airbnb host, or local friend.

11. Once all drivers and contact info is added, click next to go to the next page.

Screenshot of: Once all drivers and contact info is added, click next to go to the next page.

12. If the renter has no insurance or is purchasing coverage you can add the coverage in this step.

Screenshot of: If the renter has no insurance or is purchasing coverage you can add the coverage in this step.

13. Click "Next" after any coverage is added.

Screenshot of: Click "Next" after any coverage is added.

14. You can pick from all vehicles available at the location, you can adjust the car class dropdown if you need to assign a vehicle from a different class.

Screenshot of: You can pick from all vehicles available at the location, you can adjust the car class dropdown if you need to assign a vehicle from a different class.

15. On this step you have the option to add prepaid fuel to the contract if the customer wants to add it.

Screenshot of: On this step you have the option to add prepaid fuel to the contract if the customer wants to add it.

16. Click "Next" after assigning the vehicle.

Screenshot of: Click "Next" after assigning the vehicle.

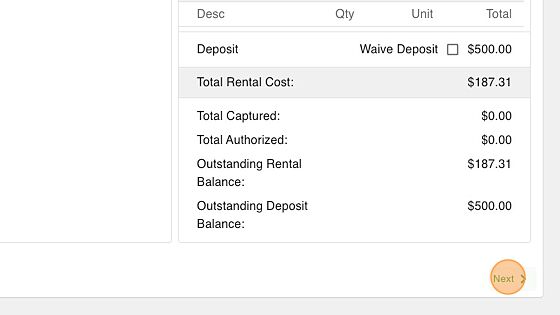
17. On this page you can then add payments by hitting the plus icon.

Screenshot of: On this page you can then add payments by hitting the plus icon.

18. In the screen that opens you can adjust the terminal device to charge if you are processing payment in person or you can use an existing card on file if the card was tokenized or add a manual keyed in entry.

Screenshot of: In the screen that opens you can adjust the terminal device to charge if you are processing payment in person or you can use an existing card on file if the card was tokenized or add a manual keyed in entry.

19. You can adjust the amount to charge by changing the type dropdown. The default option selected will be determined by your company.

Screenshot of: You can adjust the amount to charge by changing the type dropdown. The default option selected will be determined by your company.

20. You can also change the transaction type to process an authorization or sale.

Screenshot of: You can also change the transaction type to process an authorization or sale.

21. In this example we are collecting the deposit as an authorization first. After clicking save it will prompt the customer to follow the prompts on the terminal.

Screenshot of: In this example we are collecting the deposit as an authorization first. After clicking save it will prompt the customer to follow the prompts on the terminal.

22. Once the authorization is collected we will click create again to collect the total amount as a sale.

Screenshot of: Once the authorization is collected we will click create again to collect the total amount as a sale.

23. Because we just got the card from the customer we will go and select use existing card.

Screenshot of: Because we just got the card from the customer we will go and select use existing card.

24. We will select their card and the rest of the fields are already selected to process the balance as a sale. Once we select the card and click save it will charge the card.

Screenshot of: We will select their card and the rest of the fields are already selected to process the balance as a sale. Once we select the card and click save it will charge the card.

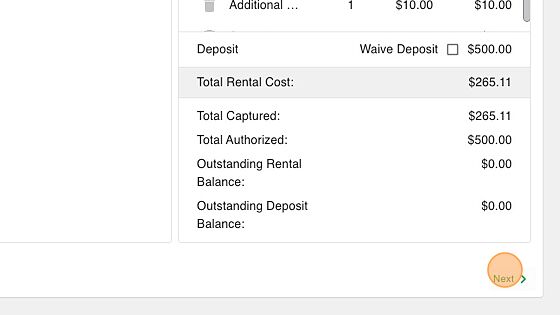
25. We can confirm that we have collected enough payments for the rental total as well as either captured the deposit as a sale or have authorized enough on the card because both the outstanding rental balance and outstanding deposit balance is 0.

Screenshot of: We can confirm that we have collected enough payments for the rental total as well as either captured the deposit as a sale or have authorized enough on the card because both the outstanding rental balance and outstanding deposit balance is 0.

26. We will click next to go to the next screen.

Screenshot of: We will click next to go to the next screen.

27. The last screen is to get the customers signature. The Travel Platform has several ways to collect signature, we will be going with the simplest which is to download the contract and print it for the customer to sign.

Screenshot of: The last screen is to get the customers signature. The Travel Platform has several ways to collect signature, we will be going with the simplest which is to download the contract and print it for the customer to sign.

28. After downloading the contract you can check the box that the contract has been signed.

Screenshot of: After downloading the contract you can check the box that the contract has been signed.

29. Once everything is completed you can click confirm and assign to mark the contract and vehicle as On Rent.

Screenshot of: Once everything is completed you can click confirm and assign to mark the contract and vehicle as On Rent.

30. You will get one final prompt to confirm, select yes to finish opening the contract.

Screenshot of: You will get one final prompt to confirm, select yes to finish opening the contract.

Was this article helpful?